
Japanese Hand Tools
Presented by Tadatoyo Yamamoto
I would like to introduce traditional Japanese hand tools. I find traditional Japanese tools have different characteristics from Western hand tools. I have attended wood furniture making courses in a city called Takayama which is located in north-west Japan, surrounded by mountains.
The first course I attended was a hand tool course for 6 weeks. I was taught how to set planers and chisels and how to sharpen blades. Practically, I sharpened them every day for 4 to 5 hours. It was boring. But I started to have deeper insights into these tools and noticed clever inventions built into these simple tools i.e. the double- layered blade, concave dent on the reverse side of blade and learned some techniques of sharpening planers and chisels and how to use honing stones.
I have also attended a chair-making course, furniture refurbishing course and again a hand tool course.
The tools I will introduce here are:
- Planers
- Chisels
- Saws
- Honing stone

Planers
Japanese planers have wood body which is made out of a kind of oak called KASHI or stone oak, and its botanical name is Quercus Myrsinaefolia.
It is an extremely hard wood but still distorts as it dries over months. To keep the surface flatness, I was taught to use a straight gauge to find where and how much distortion there is. To rectify the distortion, a right-angled planer is used.
Blade angle of planer is determined depending on the hardness of the wood you want to plane. The softer it is, the blade angle of the planer is lower. The harder the wood you want to plane, the blade angle of the planer is higher. Ultimate case is this right angle planer.

| Species | Blade Angle | Cutting Angle | |
|---|---|---|---|
| Soft | Paulownia, Cedar, Cypress | 31°~38° | ~ 20° |
| Medium | Oak, Zelkova | 40°~42° | ~ 25° |
| Hard | Sandalwood, Ebony | 45°~90° | ~ 30° |
After I moved to Perth from Japan I tried to flatten the planer surface on the sanding paper stack on thick glass. It worked!!! Sometimes traditional techniques don’t have much value. Having said that, I still use right-angled planer.

The entire surface of planer should not touch the work surface. Only areas just before the blade edge and end of the surface should touch the work surface. The rest of the surface must be approx. 0.03 to 0.1 mm shaved off. For this surface adjustment, I use the right angle planer.

When we buy a new planer, the blade is too tight to be used. We need to shave both the surface (A) where the blade slides and side slot (B) to attain the preferred tightness.
Japanese planers also have a clipper behind the blade. This concept may have been adopted from Europe.

The blade has two layers of steel. The bottom part only a few millimeters thick is of hard steel and becomes the edge of the planer. The top part is of soft steel. The cutting edge is always at the bottom end. The rest of the blade does not affect cutting capability. If entire blade is made out of hard steel, it takes much longer to sharpen. It is unnecessary and makes us reluctant to sharpen regularly. It is faster to sharpen two-layered blades and lasts as long as solid hard planer. Probably this concept derived from the Japanese sword- making technique.
Japanese blades have a subtle thumb dent on reverse side of blade. It is an indicator showing how much blade edge wears off and whether right and left sides wear evenly.
There are small-sized special purpose planes. Some for shaving corners, some for shaving curved surfaces, some for making grooves.
Chisels
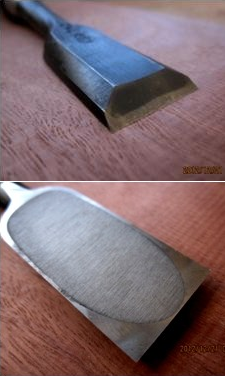
Japanese chisels also have 2 layers and thumb dents. The blade angle is set at a certain angle so that the wood handle end does not interfere with the work surface.

At the end of chisel handle, a crown is fixed. The crown is to stop wood handle end from crumbling. When new chisels are bought, the crown is too tight to push in over the handle. It is necessary to file Crown ID to enlarge slightly and also round the corner slightly. The crown must slide down along the handle as top of handle wears. If the crown cuts into the handle, then the chisels starts to bounce when hammered.

There is a special chisel for cutting corners. Some chisels are round shaped.
The chisels and planers I have were made in Sanjo city in Niigata prefecture in Japan. I visited Sanjo city hoping to see the artisan who made them, but could not locate them. I stopped by a local tool shop and was told that the chisels and planers were not made by one person only.
Nowadays, some people are specialized in wood blocks or handles, some are specialized in forging, some in heat treatment and sharpening. Others are engaged in assembling them together and supplying to wholesale channels.
Saws


Japanese saws are much thinner than Western saws. Japanese saws are pulled to cut, not pushed. Cross cutting saws have slightly more complicated tooth configurations than longitudinal cutting saws. The tooth size at far end of the saw is larger than that of the near end. Small teeth are for fine works.Woodblock printing (ukiyoe) is a form of traditional art in the early 19th century in Japan.
We can see traditional sceneries in woodblock prints since photography was not then available. One of the interesting woodblock prints was made by Hokusai Katsushika in 1822 known as “36 views of Mt. Fuji”.

Here 2 wood workers were sawing a big piece of timber, one was cutting from the top the other was cutting from the bottom. (See cover picture and below) In the left bottom corner of the picture, it shows a saw sharpener sharpening a saw blade. (See picture on right) We can imagine that the steel quality then was not very good and the teeth of the saw got blunt easily. Thus, a sharpener had to sharpen saws on site while wood workers were sawing.
Saws are replaceable. The wooden handle is not thrown away each time a saw gets blunt. Dotsuki saw is very thin 0.2 mm with reinforcement on the top. One type is for flush cutting which has no off-set so that when Dowell pins are cut, the surface is not damaged.
Honing stone
When we talk about blade flatness of planers and chisels, we are only talking about 0.01mm or less, in another words a few microns. If the surface of a honing stone has an unevenness of more than certain amount, let’s say 0.01mm, we cannot get sufficient flatness of the blade. Thus, before sharpening blades, we must make sure the honing stone surface is flat. I always have one extra #1000 honing stone and lap it over the other honing stone before sharpening blades. When you find the dent of the honing stone surface is significant, then lap it over #60 or #100 sanding paper which is fixed on thick glass. When a perfectly flat honing stone is used, the sharpened blade has a mirror-like blade surface.
The honing stone must be soaked in water for 30 minutes before use. I always leave my honing stone submerged in water.
Nowadays I use a honing guide. It works very well. I set the angle at 35 deg. for chisels except one chisel which I set at 30 deg. for fine cutting. You can set the angle to a minimum of 20 deg. but then you will feel the blade bend.
When there is a chip on the blade, it would take too long to remove the chip on an ordinary honing stone. In such a case we use a diamond honing stone. If you have a very severe chip or want to change the blade angle, a coarse surface steel with abrasive powder is used.
I strongly recommend against grinding chisels or planer blades. The blades are heat treated so if you grind the blade, the heat treatment is spoiled and it would not be as hard as the original blade any more.
When sharpening blades on honing stones, slurry (clay-like residual stone and steel mixture) remains on the stone surface. It tends to make blades slip over the stone resulting in the blade not being sharpened. Wash the slurry away after every hundred strokes or so of honing. In fact I lap the surface with another #1000 honing stone to make roughness on the stone surface every 10 minutes or so and the abrasiveness comes back.
I hope this article has given you a deeper insight and understanding into Japanese hand tools.