Machines, Knives and Embellishment's
I think everyone enjoyed our round table meeting at Lake Monger Community Shed, I believe it is the variety of presenters on such a diverse range of subjects, that means there has to be something that you are either very interested in or have never tried before.
Knife Making
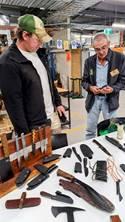
Paddy Baker had brought along a great selection of knives and hatchets to show us and talked about the
process involved in sourcing good quality steel and what makes a good knife.
It was not long before all of
us wanted to know more about the variety and quality of the timber blanks that he had brought along, most of which were from goldfield timbers that were slow growing such as Snakewood, Black Mulga, Miniritchie or taken from burls, but the colours and appearance were really outstanding.
In order to maintain the quality of the handles, the challenge is to stabilise the timber, and he showed us the vacuum chamber he uses to create a negative pressure to allow the resins to impregnate the timber, however this can take as long as 3 – 4 months to occur.
It was an amazing collection of knives and was something we all wanted to know more about.
Gilding
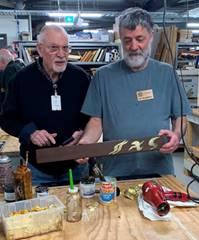
Kim Horne showed us his wide range of tools and brushes that he uses, together with a box full of imitation gold leaf and quite a few samples to show us what could be achieved with a bit of practice.
Kim explained that he had spent many years learning the finer points of gilding, but the basics were not difficult, and you could apply it to many surfaces, including glass and achieve presentable results.
He said water gilding will provide the best finish, but that each element involved is almost a craft in its own
right.
Using an oil-based size, was Kim’s preferred adhesive, and could be applied to metal, windows and even outside, and still get a fine finish.
A water-based size is easy to use and ideally suited for a beginner, as once applied it is cloudy but dries clear and allows more time to apply the gilding.
Kim showed Ian Houghton just how easy it was to apply! It just takes a bit of practice.
He recommended squirrel hair mop brushes as they can hold an incredible amount of varnish or paint and were ideal for applying guilding.
It should only be applied in a dust free room that has NO draughts as any air movement and you will lose your gold leaf.
Kim also talked about how to achieve a black lacquered finish, as well as the use of spray cans of flower dye, distressed finishes and many, many coats of shellac.
I think that this could almost be a series of weekly lectures, but the results he achieved were nothing short of fantastic.
Pyrography
Basia Lamb had set up her work station to show us all what can be done using Pyrography to create different designs on timber.
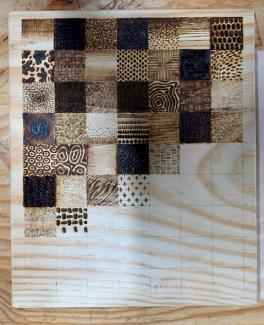
Wood burning uses texture to create interest and design, and you should always plan ahead for what you want to achieve.
Remember pressure is not important – time is!
The longer you make contact with the timber the darker the burn, and to speed up if you want less colour.
You can practice with any timber, but Balsa Wood is a great place to start, and you will need to practice because it is your steady hand and control that is the key.
To minimise the scorch at the start, you need to make sure the hand piece is at peak heat and have the nib already moving before you make contact with the timber.
You would use a ball point nib for indents, but it takes a lot of heat.
A “U” shaped nib to do feathered lines and to maintain the heat.
A shovel shader for fish scales, but this can take a lot of practice.
Basia was using a wood burning station with a temperature control on the front for ease of use, and which is readily available.
Only use natural timbers and not any that have been treated,
Turn the heat down for lighter areas, timbers like Maple and Marri work well, but using Jarrah is not successful.
Use transfer paper to mark your designs onto the timber or the more expensive purple made of graphite, these are available from Jacksons.
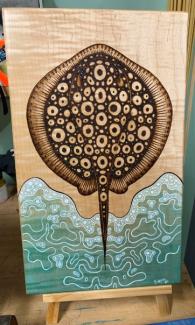
Basia had many samples of the different methods on display, including pet portraits which added paint to highlight the eyes, and some beautiful examples of her skill using a mix of media.
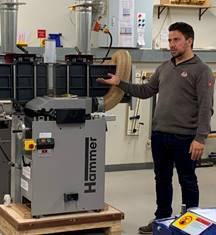
Felder Machinery
Con Badenhorst started off by telling us about the history of the Felder Group and how they were building woodworking machines in Austria in 1956 and quickly became a successful supplier of combination machines and saws.
He spoke about his own background and that both his grandparents had been woodworkers, and how he had learned to use a spindle moulder.
The company continued to grow during the 1980’s and continued to expand its range until the brochure that Con had brought along covered more than 200 machines in the Felder/Hammer range.
You can find a huge range of videos covering their machines on YouTube, together with many DIY projects.
He talked about the benefits of being involved in woodworking groups and how using some of the analogue machines continues to expand everyone’s skill set and felt that getting a hobby was better than getting therapy.
We were still talking to him when they started to put the lights out and threatened to lock us in for the night.
There had to be something of interest for all of us in the variety of subjects we had covered tonight, and I am sure most of us will have new ideas we will want to try.
On behalf of all of us at FWWA I would like to thank our presenters, Basia Lamb, Paddy Baker, Kim Horne and Con Badenhorst for taking the time to come along and encourage us to expand what we do.
