
All about hinges
Reporter:
Staff reporter
When it comes to fine woodworking the difference between a good piece and a masterpiece often hinges on the details—quite literally. While selecting the perfect timber veneer or mastering complex joinery takes up plenty of workshop discussion, the choice and installation of hinge hardware is an art form in its own right.
To shed light on this crucial element of the craft, Peter Hall and Life Members Ian Houghton and Paul Birchall, recently shared their practical wisdom, individual workshop philosophies, and troubleshooting tips.
Hinges for box making with Life Member Paul Birchall
Paul's Philosophy on Box-Making and Hinges
Life Member Paul Birchall shared his extensive practical knowledge regarding the hidden challenges, costs, and functionalities of various box-making hinges. Drawing from years of personal experience in his own workshop, Paul explained that selecting the right hinge involves balancing appearance, overall quality, hardware cost, and installation difficulty.
Basic and Budget Hinge Variations
Paul walked attendees through the various types of budget-friendly hinges he has used, noting their individual pros and cons:
Pivot Rods: Paul demonstrated a highly simple mechanism used by Kevin on medal presentation boxes, which consists of basic brass rod pieces sourced online and fitted into holes drilled in the sides.
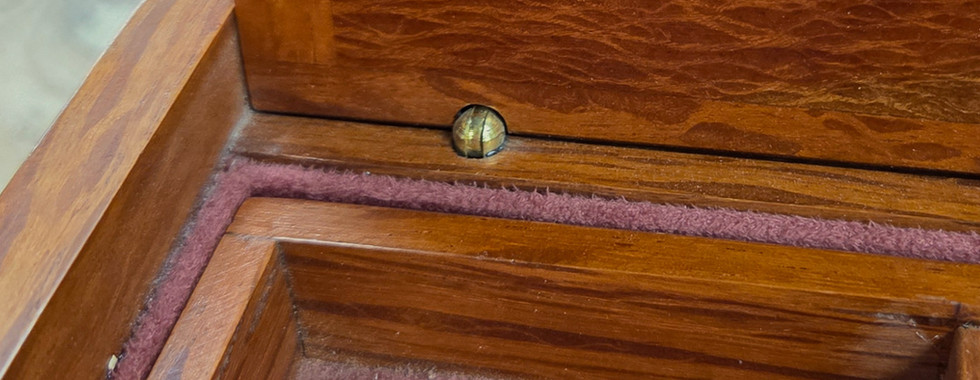
Barrel Hinges: Consisting of two small brass barrels connected by a central pivot pin, these look simple and cost-effective. However, Paul warned against buying extremely cheap versions because poor manufacturing alignment can make them look terrible. He noted that they require a precise 45-degree bevel cut on the wood and perfect alignment, as even a tiny error will cause the box lid to twist. Paul relies on quick-cure epoxy or superglue to secure them tightly.
Standard Butt Hinges: A traditional choice, though Paul expressed disappointment at the poor quality of hardware found on mainstream store shelves. Because standard butt hinges lack a mechanism to hold a lid open, Paul points out that woodworkers must install an additional stay or a small chain, which can look untidy or require backing modifications if the box is lined.
High-End Stop Hinges and Premium Options
For special boxes, Paul discussed hardware featuring built-in stops to eliminate the need for extra chains or stays:
Butt Hinges with Stops: Brands like Brusso open to about 95 degrees and stop automatically. Paul mentioned that while beautifully engineered, they are incredibly expensive—ranging from $90 to well over $100 a pair compared to an $8 commercial pair. He noted that cheaper Chinese-manufactured versions are available via specialized suppliers and function similarly. Paul also mentioned that high-end makers like Andrew Crawford offer premium stop hinges in polished stainless steel.
Piano Hinges: Paul finds neat, 7mm wide piano hinges to be a highly practical, time-saving solution for small trinket or drinking boxes. They require a small rebate cut into the back of the box, and the top leaf screws directly onto the lid.
Quadrant Hinges, Side Hinges, and Innovative Designs
Paul highlighted the challenges of using advanced hardware for luxury box projects:
Quadrant and Side Hinges: These high-end hinges feature a small quadrant support arm that controls the lid's opening angle. Paul noted that while beautiful and shiny, they are notoriously difficult to install because woodworkers must accurately drill and hollow out a deep recess for the curved arm to retract into without sticking. They can also be very expensive due to high international shipping costs.
The Knuckle Hinge: Paul shared an advanced strap hinge designed by a West Australian craftsman named Andrew Jarman, which was later adapted by another maker named Andrew Crawford. This design features a perfectly rounded knuckle at the back with a built-in stop, removing the need to cut deep holes for an internal quadrant arm. aul considers these his preferred choice for high-end, truly special box project


Wooden hinges with Peter Hall
Peter's Philosophy on Making Wooden Hinges
Peter Hall detailed his experimentation with crafting custom, shop-made wooden hinges. Utilizing basic boxes made out of Queensland Maple to demonstrate his progress, Peter shared the specific machinery, joinery alignment, and troubleshooting methods required to master this specialized technique.
Custom Dowels and Centering Experiments
Rather than using commercial options, Peter prefers to manufacture his own round dowels from the exact same timber species as his boxes.
The Dowel Maker: Peter attaches a shop-made jig to a router table with a straight bit. By feeding square stock into the jig, the router bit does the bulk of the work, and a finished stainless steel hole takes off the final fraction of a millimetre, burnishing the dowel perfectly smooth without any sanding.
The Centering Dilemma: A major challenge Peter faced was finding a way to drill perfectly centered holes through the short dowel segments. His initial drill-press attempts resulted in wandering bits and ruined pieces. He solved this by utilizing a custom 3/8-inch flange pin centering jig and laser-cut acrylic guides to achieve quick, repeatable accuracy.
Installation, Gluing, and Troubleshooting
The process of joining a wooden hinge requires meticulously cutting matching recesses into the box using a cove bit. Peter aims to keep the pivot pin perfectly balanced—placing roughly 48% of the dowel below the joint line and 48% above, leaving a tiny fraction of a millimetre of clearance at the back so the lid doesn't bind.
During assembly, Peter alternates segments by gluing some to the box base and others to the lid, applying wax to the opposing unglued sections so the mechanism doesn't lock up permanently. He candidly highlighted his own mistakes on two prototype boxes:
On one box, Peter placed the pivot pin too close to the edge, causing the lid to open too far and pop out clumsily.
On the second box, Peter overcompensated by putting the pins too deep, which restricted the lid from opening to his preferred 95-degree angle.
Innovative Variations and Workshop Tips
Peter has expanded his experiments beyond standard wooden hinges into unique design variations:
Magnetic Pivots: After receiving a tip from Stephen Finch, Peter trialed using tiny, high-strength magnets instead of steel wire pins between the dowel segments, creating a highly robust connection.
Wooden Piano Hinges: By painstakingly gluing interlocking strips of timber together, Peter successfully built a continuous all-wooden piano hinge for a custom chisel case.
To finish his presentation, Peter shared a practical tip for installing commercial 95-degree stop hinges. He uses a small shop-made spacer he calls a "box buddy". By slipping this over his router bit, clamping his box base and lid together, and setting stop blocks on either side, Peter can rout perfectly aligned hinge recesses on both pieces simultaneously, completely avoiding measurement errors and wood tear-out.


Hiding hinges with Life Member Ian Houghton
Life Member Ian Houghton shared his professional techniques for incorporating hidden hinges into high-end cabinetry. Drawing from his extensive experience working with timber veneers, Ian explained his strong preference for keeping hardware entirely concealed to protect the clean, uninterrupted lines of a finished piece
Ian's Philosophy on Furniture Making and Hinges
Ian predominantly builds furniture with detailed veneering, and he has a strong dislike for visible back hinges because he prefers not to look at hardware on a finished piece. He also dislikes traditional layouts where doors simply overlap or sit proud of the cabinet sides. Instead, Ian's preferred method is to construct cabinets with a 45-degree mitre on both the front and the side, allowing the timber veneer to run continuously all the way around the corners.
Hidden Hardware and Problem-Solving Techniques
To maintain clean lines, Ian relies on specific hidden hinges and creative engineering:
Mitre Hinges: Ian uses Hafele GS45 hinges designed specifically for mitred corners, which require drilling a 36mm hole halfway down the mitre on both sides. He values these because they offer 3mm of built-in adjustment to fine-tune the door alignment.
Soss Hinges: Ian is a big fan of Soss invisible hinges because they allow doors to swing completely back against themselves. However, he notes they require highly accurate setup, as any misalignment will cause the installation to go pear-shaped.
Centred Hinges: For a wine cabinet with complex, angled sides where standard exterior hinges would cause the doors to bind, Ian solved the issue by hinging the doors from a central stile. Using flat-folding Hafele hinges, he configured them so the doors could swing entirely around to sit flat against one another.
The Importance of Shop-Made Jigs
Ian creates a custom router template or jig for virtually every single hinge he installs to guarantee dead-accurate placement. To save time, Ian uses a workshop trick he learned years ago from Neil Erasmus, where instead of laboriously hollowing out a rectangle from a solid board, he cuts a piece of wood into three strips, shapes the edges, and glues them back together around the exact required dimensions. Ian always tests his templates on a sample piece of scrap timber to perfect the fit before routing his actual project doors.
Over time, Ian has learned to thoroughly label his jigs with key setup data—such as the project name, router bit size, guide bush size, and fence depth—to eliminate the need for frustrating remeasuring down the track.
Material Sourcing and Assembly Tips
Ian sources his specialized hardware from the Hafele showroom in Malaga, typically verifying specifications online before placing an order.
When working with premium hardware like Brusso hinges, Ian highly appreciates that the manufacturer includes steel testing screws alongside the final brass ones. Because decorative brass screws are soft and break easily, Ian recommends using the steel screws to tap the initial threads into the timber. He fits just one steel screw per hinge to hang the door, tests the swing movement, and adjustments are made to ensure thedoor swings smoothly. Once the alignment is perfect, Ian drills out the remaining holes and systematically replaces the steel screws with the final brass hardware, making the assembly process completely painless.


Final Thoughts
Ultimately, whether a maker opts for premium commercial hardware or takes the time to craft entirely bespoke mechanisms from scratch, successful hinging comes down to precision, patience, and proper jig preparation.
As Ian, Peter, and Paul demonstrated through their varied approaches, avoiding a "pear-shaped" result requires a willingness to test templates on scrap wood, learn from mistakes, and develop smart workshop workarounds like the "box buddy" or steel thread-tapping screws.
By balancing structural integrity with clean aesthetics, woodworkers can ensure their next project functions as beautifully as it looks, keeping traditional craftsmanship alive and evolving in the modern workshop.